iPhones are certainly one of the best & most secure phones ever made. Apple also makes changes to iOS at regular intervals to make its operating system more secure and private.
Now, Apple has come up with something called ‘Stolen Device Protection’ that adds a layer of security when your iPhone is away from familiar locations, such as your home or workplace.
It’s a pretty useful security feature recently made available to iOS. It lets you protect your data, payment information, and saved passwords if your iPhone is ever stolen.
In simple words, when Stolen device protection is enabled on an iPhone, only knowing the iPhone’s passcode won’t be enough to view or change the sensitive information stored on the device; a user would have to go through extra security measures like biometric authentication.
With the feature turned on, these are the actions that will require a biometric check:
1. To get started, open your iPhone’s Settings app.
2. When the Settings app opens, select Face ID & Passcode.
3. Now, you will be asked to enter your iPhone passcode. Simply enter it.
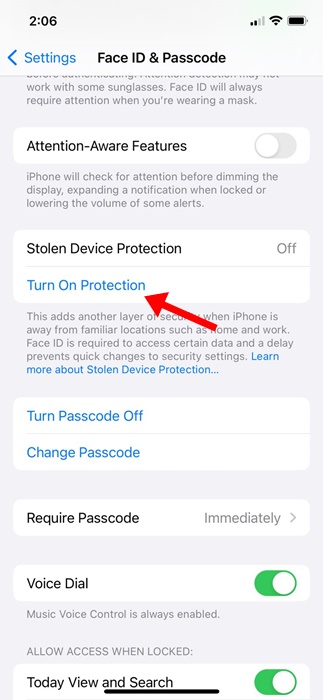
4. On the Face ID & Passcode screen, scroll down to the Stolen Device Protection section.
5. Next, tap on the Turn on Protection below it. You will be prompted to authenticate using your Face ID or Touch ID to activate the feature.

That’s it! This is how you can enable the Stolen Device Protection feature on your iPhone.
So, that’s all about how to enable Stolen Device Protection on iPhone. You can disable the feature by going through the same settings, but if you’re not in a familiar location, you will be prompted to start a one-hour security delay to deactivate the feature.
Now, Apple has come up with something called ‘Stolen Device Protection’ that adds a layer of security when your iPhone is away from familiar locations, such as your home or workplace.
It’s a pretty useful security feature recently made available to iOS. It lets you protect your data, payment information, and saved passwords if your iPhone is ever stolen.
What is Stolen Device Protection on iPhone?
Stolen Device Protection is a feature made available on iOS 17.3 and later designed to reduce the number of phone thefts. With this feature enabled, the person who has stolen your device and knows your passcode will have to go through additional security requirements to make critical changes to your account or device.In simple words, when Stolen device protection is enabled on an iPhone, only knowing the iPhone’s passcode won’t be enough to view or change the sensitive information stored on the device; a user would have to go through extra security measures like biometric authentication.
With the feature turned on, these are the actions that will require a biometric check:
- Accessing the passwords or passkeys saved in Keychain
- Access the autofill Payment methods used in Safari.
- Viewing Apple Card virtual card number or applying for a new Apple Card.
- Take certain Apple Cash and Savings actions in Wallet.
- Disabling the Lost Mode on iPhone.
- Erasing the saved content & settings.
Security Delay
When turned on, the feature also brings a Security Delay in performing specific actions. A user will have to wait an hour before making these changes.- Signing out of Apple ID
- Changing Apple ID Password.
- Update the security settings of Apple ID.
- Adding/Removing Face ID or Touch ID.
- Changing the iPhone Passcode.
- Resetting the Phone Settings.
- Turning off the Find My and Stolen Device Protection.
How to Enable Stolen Device Protection on iPhone?
Now that you know what Stolen Device Protection is, you may be interested in enabling the same feature on your iPhone. Here’s how you can enable Stolen Device Protection to add an extra layer of security to your iPhone.1. To get started, open your iPhone’s Settings app.
2. When the Settings app opens, select Face ID & Passcode.
3. Now, you will be asked to enter your iPhone passcode. Simply enter it.
4. On the Face ID & Passcode screen, scroll down to the Stolen Device Protection section.
5. Next, tap on the Turn on Protection below it. You will be prompted to authenticate using your Face ID or Touch ID to activate the feature.

That’s it! This is how you can enable the Stolen Device Protection feature on your iPhone.
So, that’s all about how to enable Stolen Device Protection on iPhone. You can disable the feature by going through the same settings, but if you’re not in a familiar location, you will be prompted to start a one-hour security delay to deactivate the feature.
